User Management – Admin Portal Management Guide
Introduction
The User Management section in SAS Cleaning Suite helps you manage all staff accounts from one central location.
From adding new employees and contractors to assigning roles, updating permissions, and managing branch access — everything can be controlled inside the Admin Portal.
This guide is designed to be simple, practical, and beginner-friendly for all users, including:
- Business owners
- Office administrators
- Operations managers
- Non-technical users
- First-time software users
Whether you manage a small cleaning team or multiple branches, User Management helps keep your staff accounts organized, secure, and easy to maintain.
What You’ll Learn
In this guide, you’ll learn how to:
- Add employees and contractors
- Manage user profiles
- Assign staff to branches
- Update employee information
- Control user access and permissions
- Disable or deactivate accounts
- Monitor login activity
- Organize your workforce more efficiently
How User Management Works
Inside SAS Cleaning Suite, every staff member receives their own account based on their role.
Each role gives users access to specific tools and features.
Simple Workflow Overview
New Staff Added → Role Assigned → Branch Assigned → Login Credentials Sent → User Access Activated → Daily Operations Managed
This structure helps keep operations secure, organized, and easy to manage.
Accessing User Management
Navigation Path
Dashboard → Workforce Management → Team Directory
or
Dashboard → User Management
Depending on your system setup, the menu name may vary slightly.
Understanding the User Management Dashboard
The User Management Dashboard gives you a complete overview of all users inside your company.
You can quickly view:
- Employee names
- Roles
- Branch assignments
- Account status
- Login activity
- Contact details
This makes it easier to monitor and manage your workforce from one place.
Types of Users in SAS Cleaning Suite
Before adding users, it’s important to understand the different user roles available in the system.
User Role Main Responsibility
Admin- Manage the entire business
Manager - Coordinate projects and teams
Cleaner- Complete assigned cleaning jobs
Contractor- Handle outsourced work
Client - Track services and communicate
Each role has different permissions and access levels.
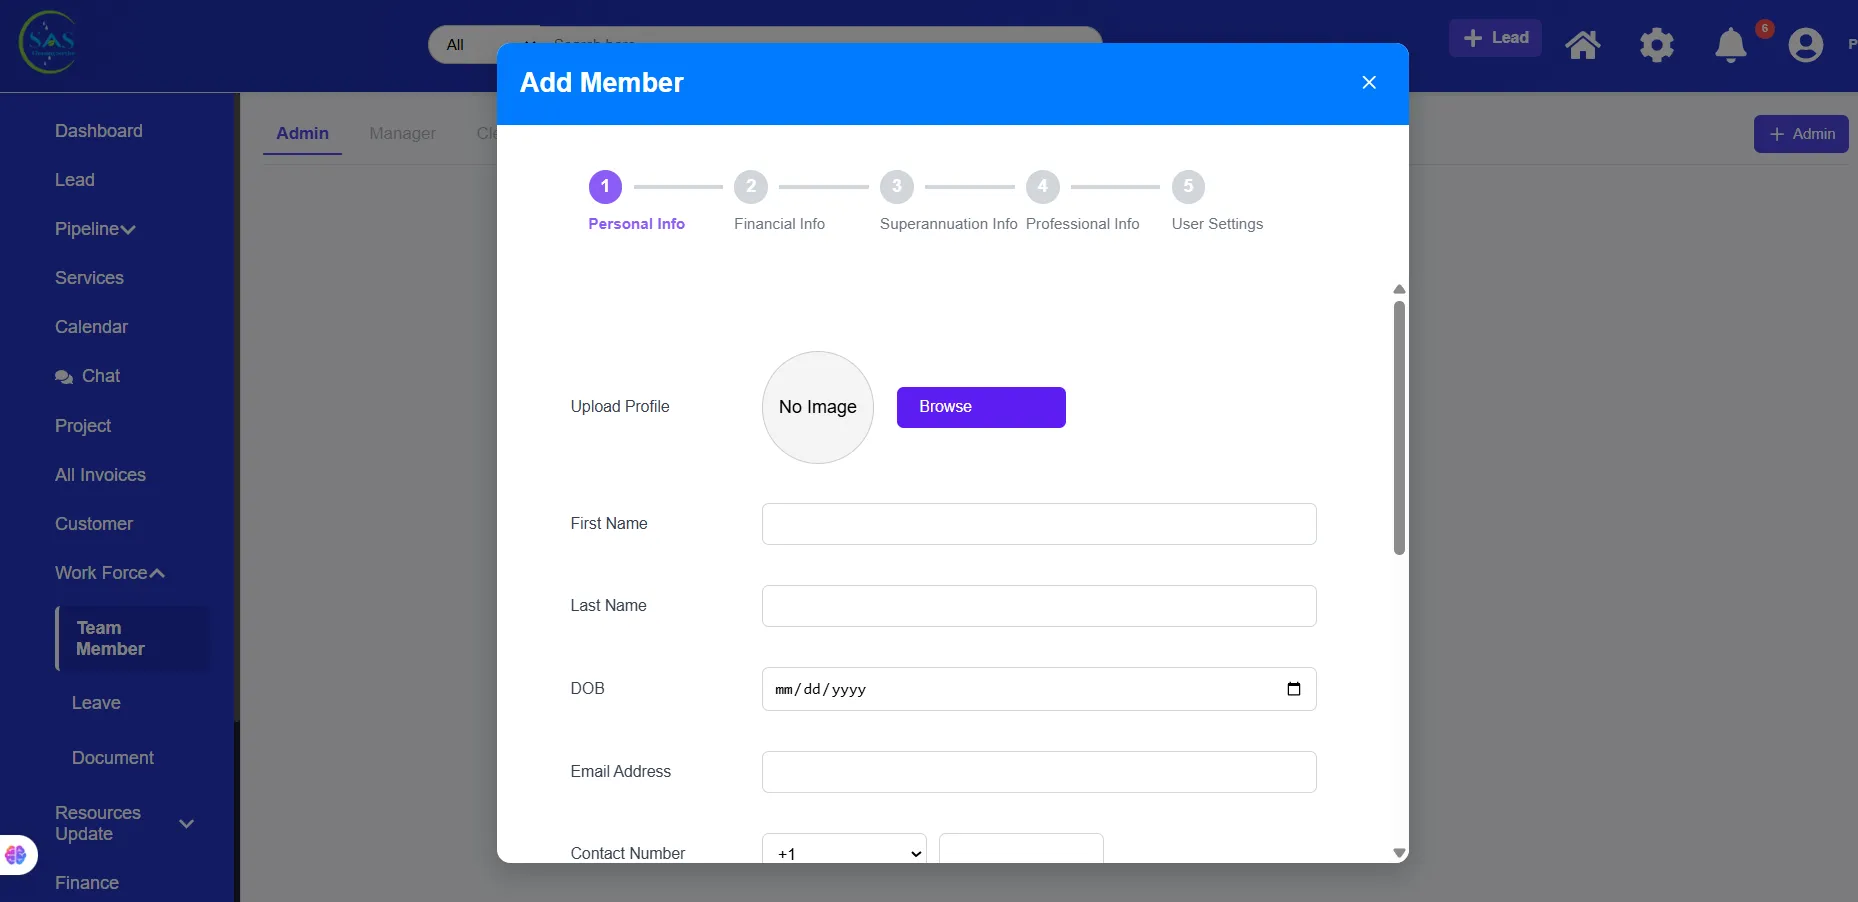
1. Add a New Employee or Contractor
Adding users allows staff members to access the system using their own login credentials.
Steps to Add a New User
Step 1: Open User Management
Go to:
Dashboard → User Management
Step 2: Click “Add User”
Select:
- Add Employee
- or
- Add Contractor
Step 3: Enter User Information
Fill in the required details such as:
- First name
- Last name
- Email address
- Phone number
- Role
- Assigned branch
Step 4: Create Login Access
The system may automatically send login credentials to the user’s email address.
The user will receive:
- Login link
- Username or email
- Temporary password
Step 5: Save the User
Click:
“Save” or “Create User”
The new account will now appear in the user list.
Important Tip Before Creating Accounts
Always double-check the email address before saving the account.
The email address is commonly used for:
- Login access
- Notifications
- Password recovery
- Communication
Using the wrong email can prevent users from accessing their account properly.
2. Assign Users to Branches
Branch assignment helps organize staff based on work locations.
This is especially useful for companies operating in multiple cities or service areas.
Steps to Assign a User to a Branch
- Open the user profile
- Go to “Branch Assignment”
- Select the appropriate branch
- Save changes
The assigned branch may affect:
- Schedules
- Attendance tracking
- Project visibility
- Staff reporting
3. Edit User Information
You can update user information at any time if employee details change.
Information You Can Update
Admins can modify:
- Contact details
- Profile photos
- Branch assignments
- Roles and permissions
- Employment details
- Emergency contacts
Keeping records updated helps improve communication and reporting accuracy.
Steps to Edit a User Profile
- Open the Team Directory
- Select the user profile
- Click “Edit”
- Update the required information
- Save changes
The updates apply immediately after saving.
4. Manage User Roles & Permissions
Roles determine what users can access inside the platform.
This helps protect sensitive business information and keeps workflows organized.
Common Role Examples
Admin
Can access:
- Business settings
- Financial reports
- User management
- Projects
- Payroll
- System settings
Manager
Can access:
- Team schedules
- Projects
- Staff coordination
- Work reports
Cleaner
Can access:
- Assigned jobs
- Clock-in tools
- Work updates
- Schedules
Contractor
Can access:
- Assigned projects
- Attendance tools
- Project communication
Steps to Change User Roles
- Open the user profile
- Select “Roles & Permissions”
- Choose the new role
- Save changes
Role changes update the user’s access permissions automatically.
5. Deactivate or Disable Users
If a staff member leaves the company or no longer requires access, admins can deactivate the account.
This improves security and prevents unauthorized access.
What Happens When a User Is Disabled?
Disabled users:
- Cannot log in
- Cannot access company data
- Remain stored in historical records
This helps preserve payroll, attendance, and reporting history.
Steps to Disable a User
- Open the user profile
- Click “Deactivate User”
- Confirm the action
The account will immediately lose access to the system.
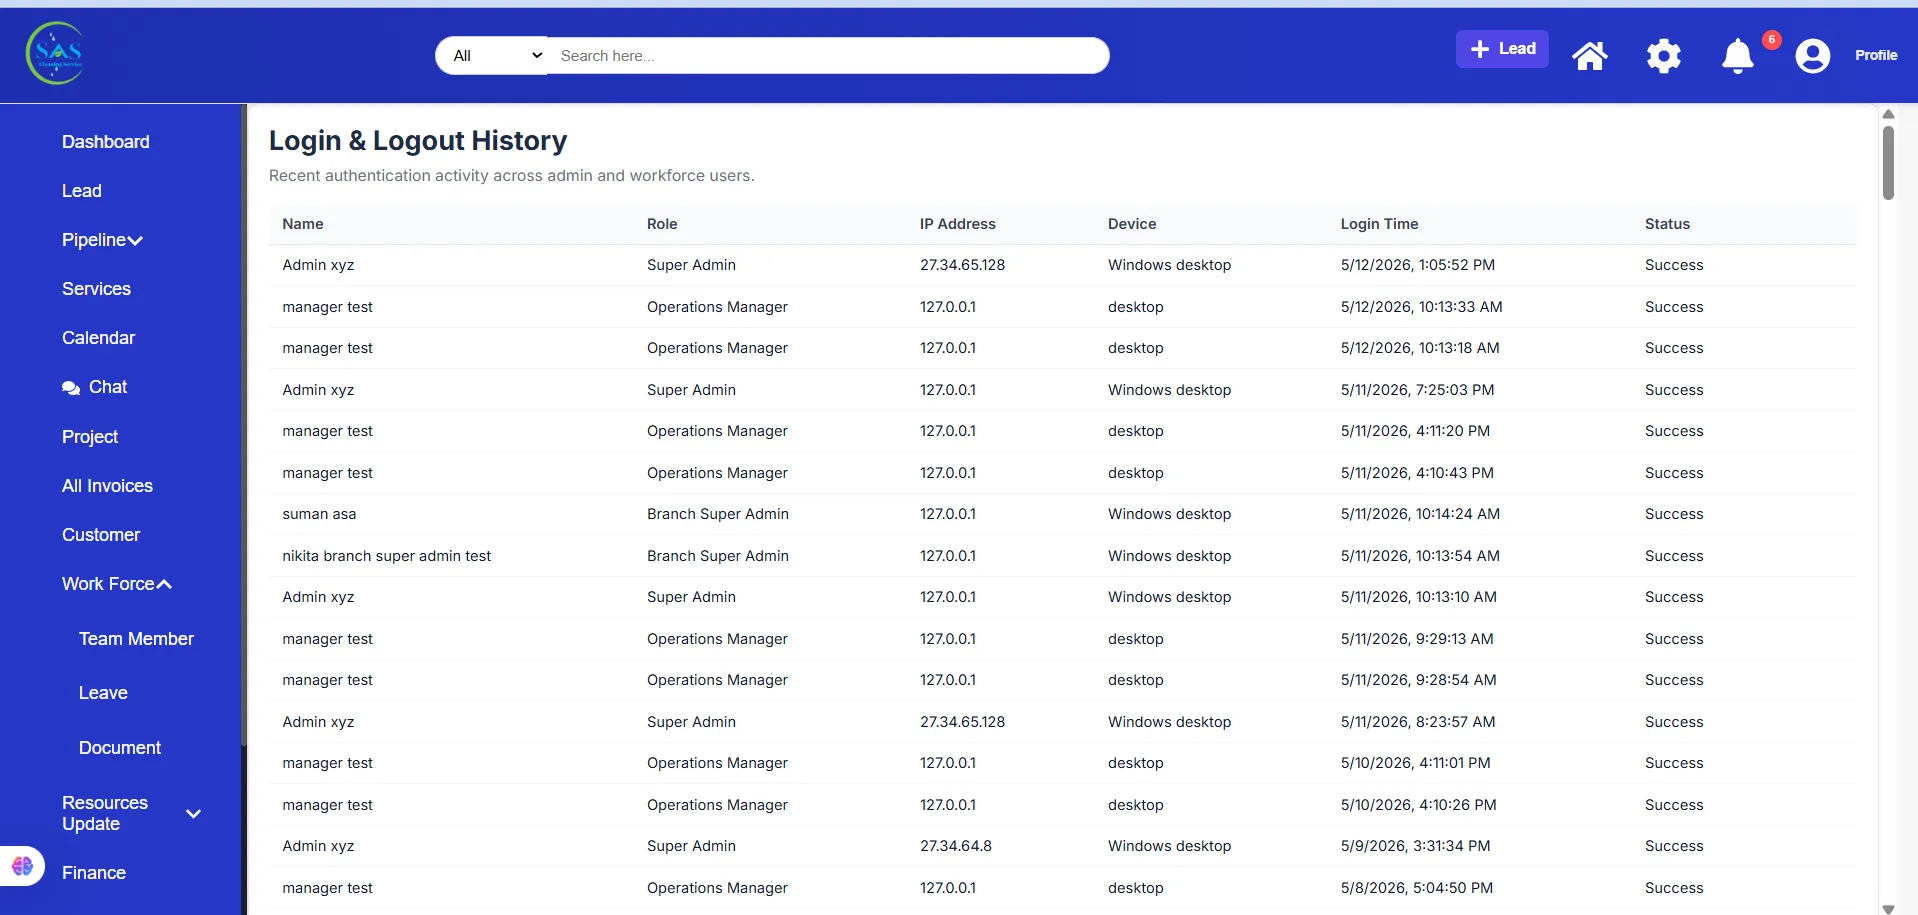
6. Monitor User Activity
Admins can monitor account activity for security and operational purposes.
Activity Information May Include
- Last login date
- Device activity
- Account status
- Attendance history
- Timesheet updates
This helps admins identify inactive accounts or unusual activity.
7. Manage Employee Documents
The system can also help securely organize employee-related documents.
Common Documents May Include
- ID verification
- Certifications
- Contracts
- Training records
- Compliance documents
Keeping documents centralized helps improve organization and compliance tracking.
8. Search & Filter Users
As your company grows, finding users quickly becomes more important.
The search and filter tools help admins locate staff members faster.
You Can Search By
- Name
- Role
- Branch
- Status
This makes workforce management easier and more efficient.
User Management Workflow Example
Here’s a simple example of how user management works inside SAS Cleaning Suite.
Example Workflow
- Admin hires a new cleaner
- Admin creates the employee account
- The cleaner receives login credentials
- The cleaner logs into the Cleaner Portal
- The manager assigns cleaning projects
- The cleaner starts daily operations
- Attendance and work reports update automatically
This workflow helps reduce manual coordination and improves operational efficiency.
Common Mistakes to Avoid
Avoid these common user management mistakes:
- Using incorrect email addresses
- Assigning the wrong role
- Forgetting branch assignments
- Giving unnecessary permissions
- Leaving inactive accounts enabled
- Not updating employee information regularly
Reviewing accounts regularly helps keep the system secure and organized.
Best Practices
To manage users more effectively:
✔ Use clear and accurate employee information
✔ Assign the correct user role
✔ Keep branch assignments updated
✔ Disable accounts for inactive staff
✔ Review permissions regularly
✔ Monitor login activity for security
✔ Keep employee records organized
✔ Use professional company email addresses when possible
These practices help maintain a secure and efficient workforce system.
Conclusion
The User Management section in SAS Cleaning Suite helps you organize your workforce more efficiently from one centralized system.
With proper user management, you can:
- Improve staff coordination
- Control system access securely
- Organize teams and branches
- Reduce operational confusion
- Improve communication across the company
By keeping user accounts organized and updated, your business can operate more smoothly, securely, and professionally every day.